Composite
Composite는 객체들을 트리 구조로 구성한 다음, 이 구조들을 개별 객체처럼 다룰 수 있게 하는 구조 디자인 패턴입니다.

Intent
Composite 패턴은 앱의 핵심 모델이 트리로 표현될 수 있을 때만 의미가 있습니다.
예를 들어, Products와 Boxes 두 가지 유형의 객체가 있다고 가정합시다. Box에는 여러 Products와 더 작은 Boxes가 포함될 수 있습니다. 이런 작은 Boxes에도 Products나 더 작은 Boxes가 들어갈 수 있습니다.
Problem
주문 시스템을 만들고 있다고 가정합시다. 주문에는 포장 없는 단순한 제품과 제품으로 채워진 상자, 그리고 다른 상자들이 포함될 수 있습니다.
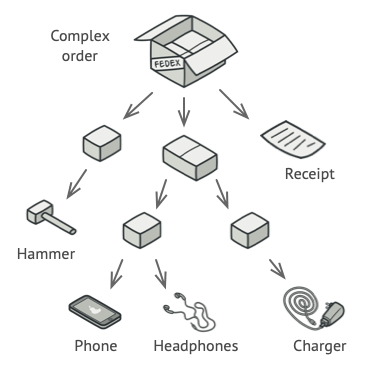
이런 주문의 총 가격을 어떻게 결정할까요?
직접적인 접근 방식을 시도할 수 있습니다: 모든 상자를 열고, 모든 제품을 살펴본 다음 총액을 계산합니다. 하지만 이 접근 방식은 프로그램에서 구현하기 어렵습니다. 모든 클래스와 상자의 중첩 수준을 미리 알아야 합니다.
Solution
Composite 패턴은 총 가격을 계산하는 메서드를 선언하는 공통 인터페이스를 통해 Products와 Boxes를 다루도록 제안합니다.

이 메서드는 어떻게 작동할까요?
- 제품: 단순히 제품의 가격을 반환합니다.
- 상자: 상자에 포함된 각 항목을 순회하며 가격을 묻고, 이 상자의 총액을 반환합니다.
상자 안에 중첩된 상자가 있다면, 모든 내부 컴포넌트의 가격이 계산될 때까지 재귀적으로 순회합니다.
이 접근 방식의 가장 큰 이점은 트리를 구성하는 객체의 구체적인 클래스에 대해 신경 쓸 필요가 없다는 것입니다. 객체가 단순한 제품인지 복잡한 상자인지 알 필요 없이, 공통 인터페이스를 통해 동일하게 처리할 수 있습니다.
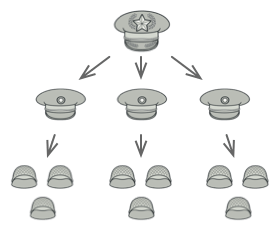
Real-World Analogy
대부분의 국가에서 군대는 계층 구조로 조직됩니다:
- 군대 → 여러 사단으로 구성
- 사단 → 여러 여단으로 구성
- 여단 → 여러 소대로 구성
- 소대 → 여러 분대로 구성
- 분대 → 실제 병사들로 구성
명령은 최상위에서 내려져 각 수준을 통해 모든 병사가 무엇을 해야 하는지 알 때까지 전달됩니다.
Structure
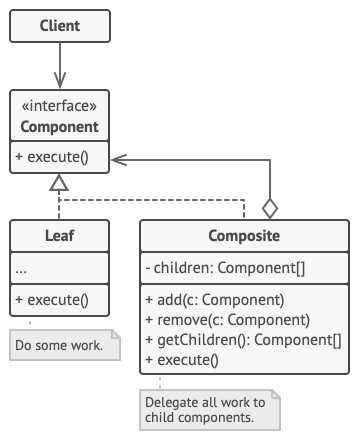
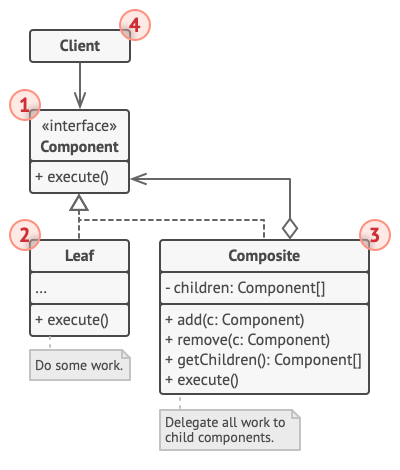
| 구성 요소 | 역할 |
|---|---|
| Component | 트리의 단순 요소와 복잡한 요소 모두에 대한 공통 작업을 설명하는 인터페이스 |
| Leaf | 하위 요소가 없는 트리의 기본 요소. 대부분의 실제 작업 수행 |
| Container (Composite) | 하위 요소를 가진 요소. 자식의 구체적인 클래스를 모르고 컴포넌트 인터페이스를 통해서만 작업 |
| Client | 컴포넌트 인터페이스를 통해 모든 요소와 작업 |
Pseudocode
그래픽 에디터에서 도형을 쌓는 예시:
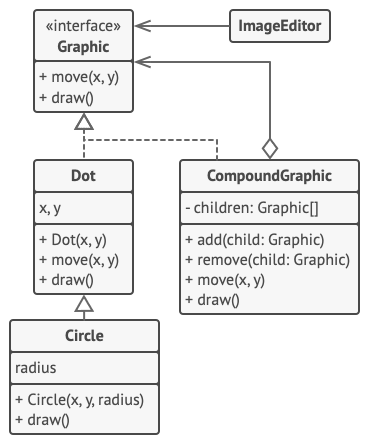
// 컴포넌트 인터페이스interface Graphic {  move(x: number, y: number): void;  draw(): void;}
// Leaf: 단순 도형class Dot implements Graphic {  protected x: number;  protected y: number;
  constructor(x: number, y: number) {    this.x = x;    this.y = y;  }
  move(x: number, y: number): void {    this.x += x;    this.y += y;  }
  draw(): void {    console.log(`Draw dot at (${this.x}, ${this.y})`);  }}
// Leaf: 원class Circle extends Dot {  private radius: number;
  constructor(x: number, y: number, radius: number) {    super(x, y);    this.radius = radius;  }
  draw(): void {    console.log(`Draw circle at (${this.x}, ${this.y}) with radius ${this.radius}`);  }}
// Composite: 복합 도형class CompoundGraphic implements Graphic {  private children: Graphic[] = [];
  add(child: Graphic): void {    this.children.push(child);  }
  remove(child: Graphic): void {    const index = this.children.indexOf(child);    if (index > -1) {      this.children.splice(index, 1);    }  }
  move(x: number, y: number): void {    for (const child of this.children) {      child.move(x, y);    }  }
  draw(): void {    console.log("=== CompoundGraphic Start ===");    for (const child of this.children) {      child.draw();    }    console.log("=== CompoundGraphic End ===");  }}
// 클라이언트 코드class ImageEditor {  private all: CompoundGraphic;
  load(): void {    this.all = new CompoundGraphic();
    // 개별 도형 추가    this.all.add(new Dot(1, 2));    this.all.add(new Circle(5, 3, 10));
    // 복합 도형 추가    const group = new CompoundGraphic();    group.add(new Dot(10, 10));    group.add(new Circle(20, 20, 5));    this.all.add(group);  }
  // 선택된 컴포넌트들을 하나의 복합 컴포넌트로 그룹화  groupSelected(components: Graphic[]): void {    const group = new CompoundGraphic();    for (const component of components) {      group.add(component);      this.all.remove(component);    }    this.all.add(group);    this.all.draw();  }}
// 사용 예시const editor = new ImageEditor();editor.load();
주문 시스템 예시
// 컴포넌트 인터페이스interface OrderItem {  getPrice(): number;  getDescription(): string;}
// Leaf: 제품class Product implements OrderItem {  constructor(    private name: string,    private price: number  ) {}
  getPrice(): number {    return this.price;  }
  getDescription(): string {    return this.name;  }}
// Composite: 상자class Box implements OrderItem {  private items: OrderItem[] = [];
  constructor(private name: string) {}
  add(item: OrderItem): void {    this.items.push(item);  }
  remove(item: OrderItem): void {    const index = this.items.indexOf(item);    if (index > -1) {      this.items.splice(index, 1);    }  }
  getPrice(): number {    let total = 0;    for (const item of this.items) {      total += item.getPrice();    }    return total;  }
  getDescription(): string {    const contents = this.items.map(item => item.getDescription()).join(", ");    return `${this.name} [${contents}]`;  }}
// 사용 예시const phone = new Product("Phone", 500);const charger = new Product("Charger", 25);const earphones = new Product("Earphones", 50);
const smallBox = new Box("Accessories Box");smallBox.add(charger);smallBox.add(earphones);
const bigBox = new Box("Main Box");bigBox.add(phone);bigBox.add(smallBox);
console.log(`Order: ${bigBox.getDescription()}`);console.log(`Total Price: $${bigBox.getPrice()}`);// Output:// Order: Main Box [Phone, Accessories Box [Charger, Earphones]]// Total Price: $575
Applicability
다음의 경우에 패턴을 사용합니다:
트리 구조가 필요할 때
트리와 같은 객체 구조를 구현해야 할 때 사용합니다. Composite 패턴은 공통 인터페이스를 공유하는 두 가지 기본 요소 유형(단순 리프와 복잡한 컨테이너)을 제공합니다.
단순/복잡 요소를 동일하게 처리할 때
클라이언트 코드가 단순 요소와 복잡한 요소를 동일하게 처리하도록 하고 싶을 때 사용합니다. Composite 패턴으로 정의된 모든 요소는 공통 인터페이스를 공유하므로, 클라이언트는 작업하는 객체의 구체적인 클래스에 대해 걱정할 필요가 없습니다.
How to Implement
-
트리 표현 가능 확인: 앱의 핵심 모델이 트리 구조로 표현될 수 있는지 확인합니다. 단순 요소와 컨테이너로 분해해 봅니다. 컨테이너는 단순 요소와 다른 컨테이너를 모두 포함할 수 있어야 합니다.
-
컴포넌트 인터페이스 선언: 단순 요소와 복잡한 요소 모두에 의미 있는 메서드 목록으로 컴포넌트 인터페이스를 선언합니다.
-
Leaf 클래스 생성: 단순 요소를 나타내는 leaf 클래스를 만듭니다. 프로그램에는 여러 개의 다른 leaf 클래스가 있을 수 있습니다.
-
Container 클래스 생성: 복잡한 요소를 나타내는 container 클래스를 만듭니다. 하위 요소에 대한 참조를 저장할 배열 필드를 제공합니다. 배열은 리프와 컨테이너를 모두 저장할 수 있어야 하므로 컴포넌트 인터페이스 타입으로 선언합니다.
-
자식 관리 메서드 정의: 컨테이너에 자식을 추가하고 제거하는 메서드를 정의합니다.
Pros and Cons
장점
| 장점 | 설명 |
|---|---|
| 편리한 트리 작업 | 다형성과 재귀를 활용하여 복잡한 트리 구조를 더 편리하게 다룰 수 있습니다 |
| Open/Closed Principle | 기존 코드를 수정하지 않고 새로운 요소 유형을 도입할 수 있습니다 |
단점
| 단점 | 설명 |
|---|---|
| 공통 인터페이스 설계 | 기능이 너무 다른 클래스들에 공통 인터페이스를 제공하기 어려울 수 있습니다 |
| 과도한 일반화 | 특정 시나리오에서 컴포넌트 인터페이스가 과도하게 일반화될 수 있습니다 |
Relations with Other Patterns
| 패턴 | 관계 |
|---|---|
| Builder | 복잡한 Composite 트리를 생성할 때 Builder를 사용하여 생성 단계를 재귀적으로 실행 |
| Chain of Responsibility | Composite와 함께 사용할 때, leaf가 요청을 받으면 모든 부모 컴포넌트를 통해 객체 트리의 루트까지 전달 |
| Iterator | Composite 트리를 순회할 때 Iterator 사용 |
| Visitor | 전체 Composite 트리에 대해 작업을 실행할 때 Visitor 사용 |
| Flyweight | Composite 트리의 공유 leaf 노드를 Flyweight로 구현하여 RAM 절약 |
| Decorator | Composite와 Decorator는 모두 재귀적 합성을 사용하지만 목적이 다름. Decorator는 책임 추가, Composite는 결과 집계 |
| Prototype | 복잡한 구조를 재구성하는 대신 Prototype으로 복제 가능 |